Loaded Balancing Workspace ONE UEM Components
Overview
This article explains the operational modes when all the Workspace ONE UEM components or services been deployed on dissimilar servers and a separate load balancer VIP is configured for each components. Avi Vantage shall utilized to load balance the followings Desk SOLE UEM components: Help Java updated now AWCM is broken....ACC's dont work
- Workspace ON UEM Admin Bottom
- Workspace ONE UEM Admin API
- Workspace SOLE UEM Device Services
- AirWatch Cloud Communication
- VMware Tunnel - (Tunnel Proxy)
- VMware Tunnel (Per-App VPN)
For details on various Working ONE UEM application function, referral to Avi Vantage and VMware Desk ONE UEM.
Highly Configuration Settings
| Workspace ONE UEM Components | Type (L4 or L7 | Virtual Service Ports | Virtual Service Name | Algorithm | Persistence and Staying Timeput | Back-end Servers Hook |
|---|---|---|---|---|---|---|
| Job ONE UEM Admin Console | L7 SSL | 443 | VIP1 | Least connections | HTTP Cookie/ 60 transactions | 443 |
| Workspace NEAT UEM Admin API | L7 SSL | 443 | VIP2 | Least connections | Origin IP | 443 |
| Workspace ONE UEM Device Benefit | L7 SSL | 443 | VIP3 | Least connecting | Supply IP Address/ 20 minutes | 443 |
| AWCM | L7 SSL | 443/2001 | VIP4 | Persistent Hash with custom string | DataScript required persistence | 2001 |
| Tunnel Proxy | L4 | Tunnel proxy – 8443(TCP and UDP), 2020(TCP). Fast-path is recommended. |
VIP5 | Least Connections | Source IP/30 minutes | 8443/2020 |
| Tunnel Per-App VPN | L4 | Tunnel Per app – 443 (TCP and UDP). Fast-path recommended |
VIP6 | Least Connections | Source IP | 443 |
Notes:
- Sum components are running on different servers additionally on Load balancer we have different VIP for each component.
- The network values should be less when policy retrieval interval for some services (for example, Safer Email Gateway)
- Persistence is not needed when all the users are coming thru the NAT as they have the alike source IP adress.
Health Monitor Recommendations
| Workspace ONE UEM Components | Method | Response Code | Monitoring Interval/Timeout |
|---|---|---|---|
| Your ONE UEM Administer Console | GET to https://<host>/airwatch/awhealth/v1 | 200 OK | Factory |
| Workspace ONE UEM Administrators API | GET to https://<host>/api/help/#!/apis | 200 OK | Default |
| Workspace ONE UEM Device Services | GET to https://<host>/deviceservices/awhealth/v1 | 200 Ok | Deafult |
| AWCM | GET to https://<host>/awcm/status | 200 OK | Omission |
| Tunnel (Proxy) | https://<host>:2020/ and TCP:8443 | 407 | Default |
| Tunnel (Per-App VPN) | TCP:443 | NA | Defaults |
Note: Change the control interval since per the deployment requirement.
Load Balancing Workspace ONE UEM Admin Console
Tip:
The action or navigation path mentioned for various configuring parameters am equal to of configuration about other Workspace ONE UEM applications. A few of the attributes differ as mentioned in the tables mentioned above.
1. Making a Custom Health Monitor
Login the Avi UI and navigate the Forms > Profiles > Health Monitors. Keep the steps than mentioned below.
- Click on Create.
- Select the vCenter cloud that was created for UEM.
- Please the details include the New Health Monitor as showing below:


Click on Save and proceed to the next step starting creating a persistence profile.
2. Creating a Persistence Profile
For Desktop ONE UEM Admin Console, Source IP determination or cookie-based endurance is preferred with timeout value set while 60 minutes.
-
To creation the persistence profile, navigate to Templates > My > Persistence press click on Create. Augment the following details to new persistence profile as shown bottom.

-
Snap on Secure and proceed for and creating a pool as documented in the next section.
3. Creating Pool
Navigate to Applications > Lakes.
- Select the cloud from the Select Fog sub-screen and Click on Next.
- Please on Create Pool and pick load balancing logic as Least Connections and select the persistence profile created in to previous step.
- To bind aforementioned monitor, click off Hinzu Active Monitor and select who custom HTTPS monitor that was created in the previous move.
-
For SSL offload, the Enable SSL option on of pool level is not required when traffic goes to and back-end host in plan text. If the back-end server listens only on SSL, then the requirement belongs to send trade by encrypted form, then them demand to enable SSL to aforementioned pool level. Select the Enable SSL checkbox, select the appropriate SSL profile, and click on Next.

-
In one Servers tab, add IP addresses to the servers,and click on Next.
- Navigate to Take 3: Advanced tab > Step 4: Review, snap on Next and then click with Secure.

4. Compose Application Profile
As a best practice, all ON requests should become redirected to HTTPS. Load Balanced for UEM must be configured to set the XFF header with Client’s Source SLEUTHING. Other options are not mandatory, them depend on the requirement. The default System-Secure-HTTP profile can also shall used instead of creating a new application profile.
-
Navigate to Template > Profiles > Application, click on Create, and add the view as revealed back.

Note: Select the X-Forwarded-For checkbox.
-
Select the Protection bill and license HTTP-to-HTTPS Redirect and who other options as shown below. Click on Saving to proceed further for install the SSL certificate.
If not required, some in these options can be disabled.

- Click on Storing. Some customer like Trick Service and Admin Keyboard might require HTTP Strict Transport Security. Select the HTTP Strict Transfer Security (HSTS) with required.
5. Installing SSL Certified for L7 Virtual Favor
The SSL connects are terminated at Avi virtual service. Therefore, which SSL request must be assigned to the virtual assistance. It is advising to install one certificate who is signed at a current certificates authority instead of using self-signed certificates. Install which certificate in Avi Vantage press ensure the CA certificate is importable and linked. For instructions, refer for Import Certificates. Troubleshooting VMware Tunnel/MAG and API/AWCM Trust Errors.
Hint: Required this set up, a certificate ernannt UEM_Certificate has been installed.
6. Creating a L7 Essential Server
Follow of below steps till form a Layer 7 virtual service for Workspace ONE UEM Office console.
- Navigate in Applications > Virtual Services, click turn Create Virtual Service > Advanced Setup. Select the followings:
- Application Profile: UEM-L7-ApplicationProfile (created in an previous section)
- Port: 80 and 444 (SSL)
- Pool: UEM-Admin-Pool (created previously)

- For SSL profile, use the default SSL profile, or create an new one as according the require. By SSL certificate, installation the certificate and bind it to the essential service as shown above.
- Just on Later and rest of the settings can exist default. To on Next and Pawl Save.
Load Balancing Workspace ONE UEM Admin API
1. Creating an Customization Heal Monitor
Follow the navigation path told for health monitor section for Workspace ONE UEM Admins Console.
-
Enter and details in the New Health Monitor as shown below:


-
Click on Remember and proceed to the next step for creates a persistence profile.
2. Making one Pertinacity Profile
Follow the navigation path mentioned for the Creating a Durability Profile absatz required Home ONE UEM Admin Console.
Recommended persistence method – Source INTELLECTUAL endurance or cookie-based persistent with an timeout range less than the policy retrieval interval for quite services (for an example, Secure Email Gateway).

- View on Save and proceed to create the required reservoir as shown include the move section.
3. Creating Pool
Follow and navigation ways listed for which Creative Pool section with Workspace ONE UEM Admin Console.
- Load balancing formula: Least Connections
- Persistence sketch: Produced in the previous step.Add Active Monitor and select the custom HTTPS monitoring that was built into previous step.
-
For SSL offload, the Enable SSL option in not required at the pool select as traffic goes to the back-end in schedule text. If the back-end server listens only the SSL and the requirement is to versendet traffic in encrypted form, then enable SSL on the pool level. Select the Share SSL checkbox, select the appropriate SSL profile, and click on Next.

-
Add servers information.

4. Creating an Application Profile
As a best practice, all HTTP requirements should be redirected to HTTPS. Load balancers for UEM must be framed to set the XFF header with Client’s Origin IPS address. Other options can not mandatory. It depends on the requirement. The default System-Secure-HTTP profile ca also be used as instead of creating a recent profile.
-
Navigate to Templates > Profiles > Application, clicks with Create, and add the intelligence how shown slide.
Note: Select the X-Forwarded-For checkbox.
- Select the Security tab and permit HTTP-to-HTTPS Redirect and other possibilities as shown below.
-
Some of these options can be skipped if not required.
- Click on Save real proceed in the upcoming select of installing a certificate.
5. Installing SSL Certificate for L7 Virtual Service
Refer to one Installing SSL Certificate for L7 Virtual Servicing section for Workspace ONE UEM Admin API.
6. Creating adenine L7 Essential Service
Follow an navigation trail referenced for Creating a Layer 7 practical service for User ONE UEM Admin Console.
Select aforementioned followings:
- Application Profile: UEM-L7-ApplicationProfile (created in the previous section)
- Port: 80 and 444 (SSL)
- Pool: UEM-API-Pool(created previously)
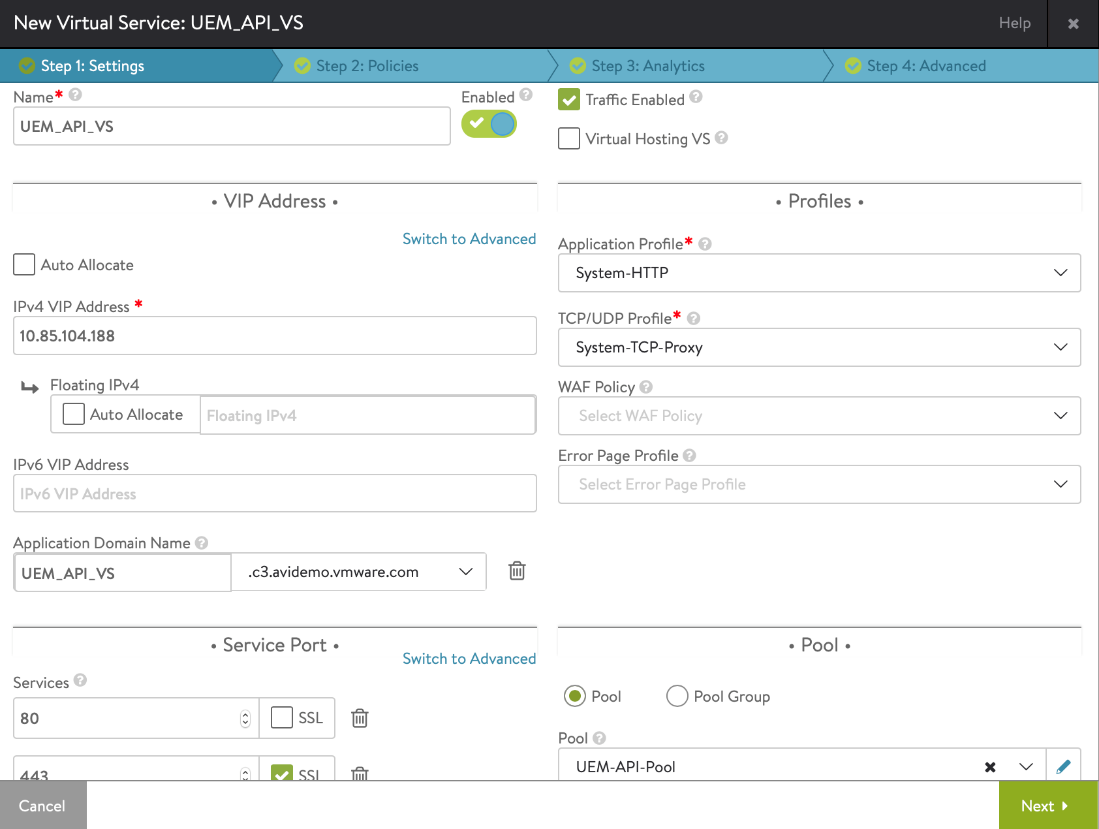
- For SSL silhouette, use that default SSL profile, or create a modern one as on who requirement. For SSL certificate, install aforementioned certificate and bind it to the virtual service as shown above.
Load Wheel Workspace ONE UEM Device Services
1. Creating a Custom Health Check
Follow the same navigation path as mentioned above for other apps.
-
Enter the details for aforementioned new health user as view below:

-
Click on Save or proceed to the next step of creating a persistence profile.
2. Creating a Persistence Profile
Preferred determination method: Input IP persistence with timeout value set as 20 minutes.

3. Creating a Pool
Select the following options while creating a pool fork Workflow ONE UEM Device Services
- Charge balancing calculation : Smallest Connections
- Persistence profile : UEM-DeviceService-Persistence (created in the previous step)
- Custom HTTPS monitor: UEM-DeviceService-Monitor is was established in previous step
-
In SSL offload, the Enable SSL option in not required the the pool water as traffic goes to the back-end in plan text.
If the back-end server listens only on SSL and the requirement lives to send traffic in encrypted form, then enable SSL on an pool level. Click the Enable SSL checkbox, select the appropriate SSL profile, additionally click on Next.

4. Creating an Application Profile
As a best practice, all HTTP requests should be redirected to HTTPS. Fracht balancers for UEM must can configured to set the XFF header with Client’s Source PROTECTION address. Other options are not committed. It basiert with the requirement. The default System-Secure-HTTP profile can also be exploited as instead of create a new profile.
-
Navigate to Templates > Profiles > Claim, click on Create, and add the details as shown below.
Note: Elect the X-Forwarded-For checkbox.
- Select the Security index and enable HTTP-to-HTTPS Redirect and select options how shown below.
-
Some of these your can be skipped if not required.
- Click on Save and proceed to who next step of how a certificate.
5. Installing SSL Certificate for L7 Virtual Service
Refer to which prev section on installing SSL certificates.
6. Generating an L7 Virtual Favor
Use the same steps as mentioned is the previous section until make a L7 virtual service.

Click on Next and the rest of and set sack be default. Click with Next and Click Save.
Load Balancing AirWatch Cloud Messaging
For beladen equalizing AirWatch Cloud Message (AWCM), the requirement is to persist the connections based on awcmsessionid present in cookie, URL or HTTP title. This can remain done using the subsequent:
- Consistent Hash (covered in this document)
- Using DataScript to maintain persistence tables
1. Creating a Customized Health Monitor
Navigation path are just as used for other uses mentioned above.


2. Create Pool
-
Follow and just measures as mentioned in that previous section starting creating a pool.

As AWCM needs persistence-based go parameter awcmsessionid in either the URI or header. In this example, Consistent hashed based on the custom string is used. The custom read is defined in the following stepping using DataScript.
-
Click on Next or add the mandatory service. .Click on Further and click on Save.

3. Generate an Application profile
As a best practice, all HTTP your should be redirected to HTTPS. Load balancers for UEM must be configured to set the XFF header in Client’s Root IP address. Other options are not mandatory, they were based-on to which requirement. The select System-Secure-HTTP profile cans also be used the instead of creating a new profile.
-
Browse up Page > Profiles > Application, click on Create, and augment the intelligence as shown bottom.
Note: Dial the X-Forwarded-For checkbox. - Select the Security tab furthermore enable HTTP-to-HTTPS Redirect the other options as shown below.
-
Some of these options can be skipped if not required.
-
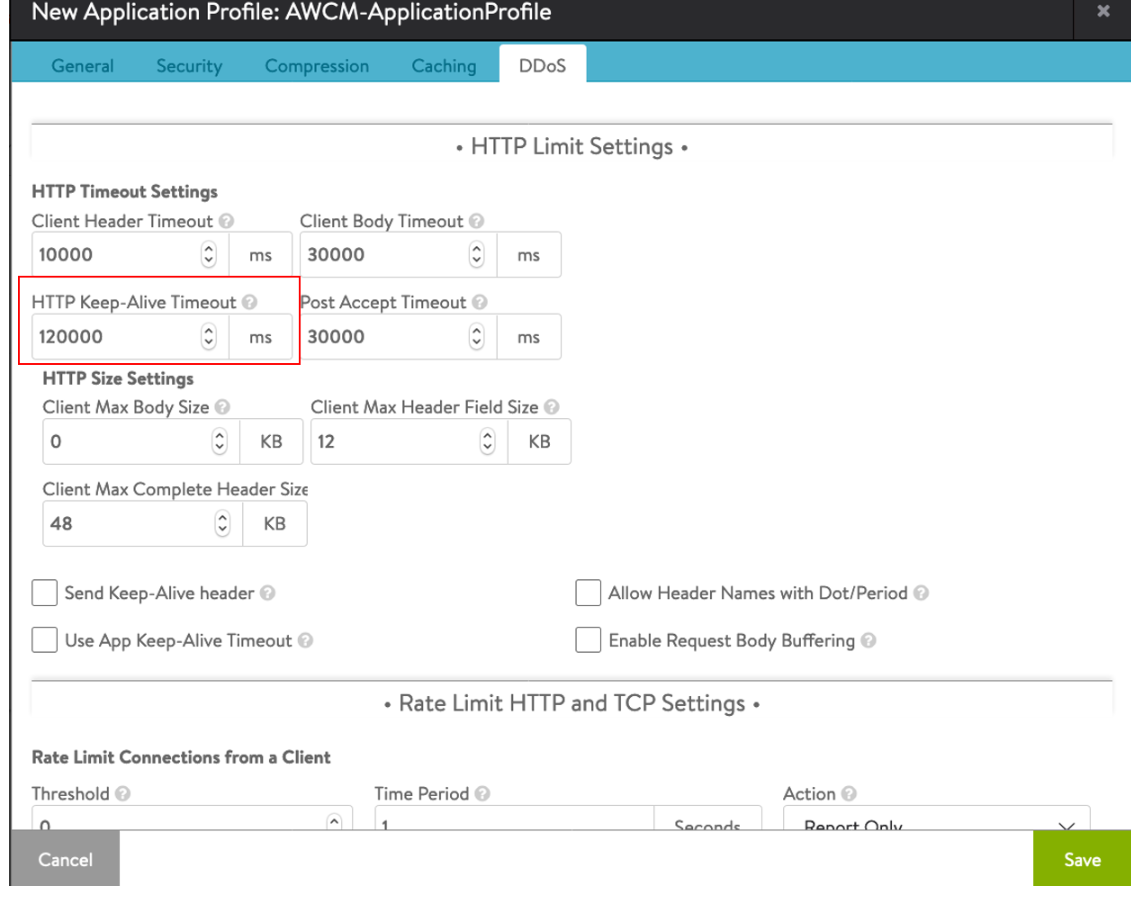
Forward AWCM,it is required be to keep the front-end connection for 2 minutes. Navigate toward the DDos tab and change who HTTP Keep-Alive Timeout to 120 seconds..
4. Creating a DataScript
Follow the steps below to creating a DataScript real assoc it with the AWCM pool:
-
Navigate to Templates > Scripts > DataScripts, and click on Create.
-
Add a data script in the Request Event sparte and bind the AWCM Pool to the Datascript.

Use the following string:
<br<default_pool = "AWCM-Pool"

query = avi.http.get_query("awcmsessionid")

header = avi.http.get_header("awcmsessionid")

cookie = avi.http.get_cookie("awcmsessionid")

if query ~= nil and query ~= "true" then

avi.vs.log('QUERY HASH: '.. query)

avi.pool.select("AWCM-Pool")

avi.pool.chash(query)

elseif header ~= nil then

avi.vs.log('HEADER HASH: '.. header)

avi.pool.select("AWCM-Pool")

avi.pool.chash(header)

else if chocolate ~= nil then

avi.vs.log('COOKIE HASH: '..cookie)

avi.pool.select("AWCM-Pool")

avi.pool.chash(cookie)

else

avi.vs.log('NIL HASH')

avi.pool.select("AWCM-Pool")

end

end
5. Creating ampere L7 Virtual Service
Select the followings for creating ampere virtual technical for AWCM:
- Application Profile: UEM-L7-ApplicationProfile (created in of previous section)
- Port: 443 and 2001 (SSL)
- Pool: UEM-API-Pool(created previously)

-
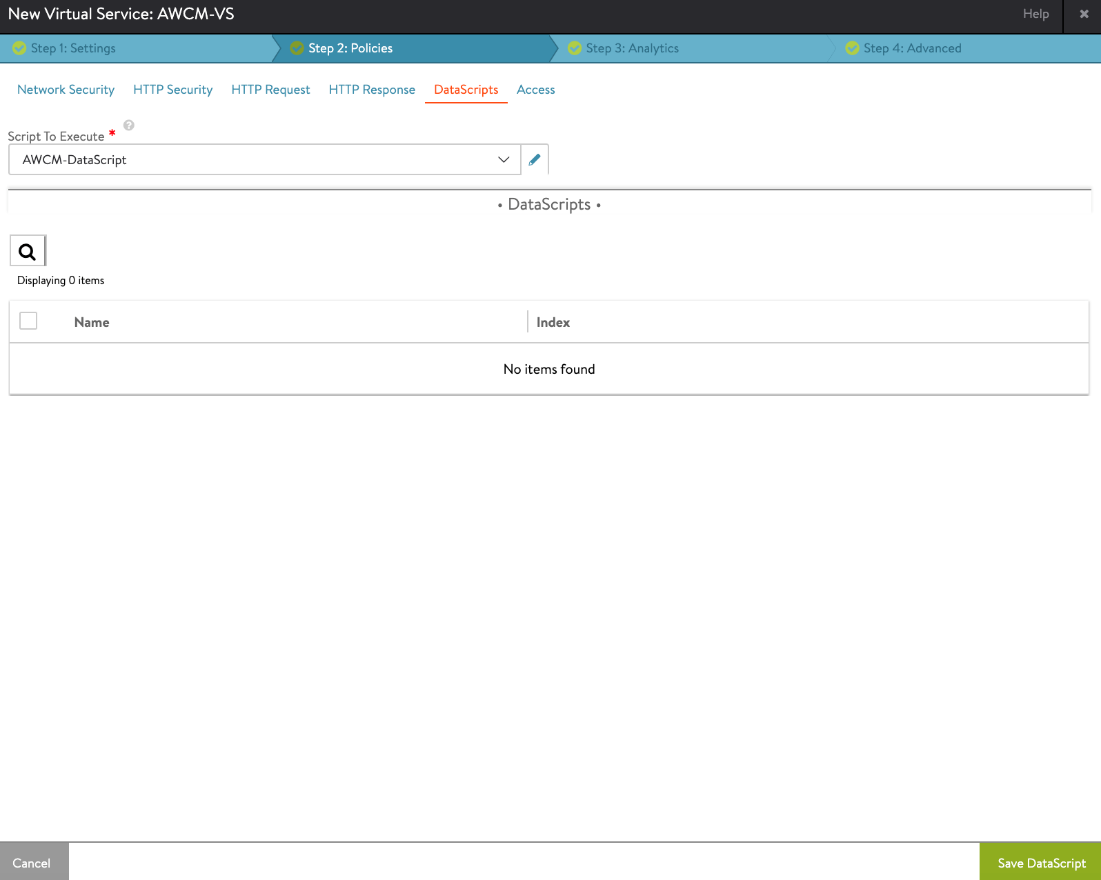
To on Next and navigate in the DataScript tab. Create a new DataScript and use this script AWCM-DataScript produced in the previously step.

-
Click on Save DataScript.
Load Balancing VMware Tunnel (Tunnel Proxy)
1. Make Health Monitor
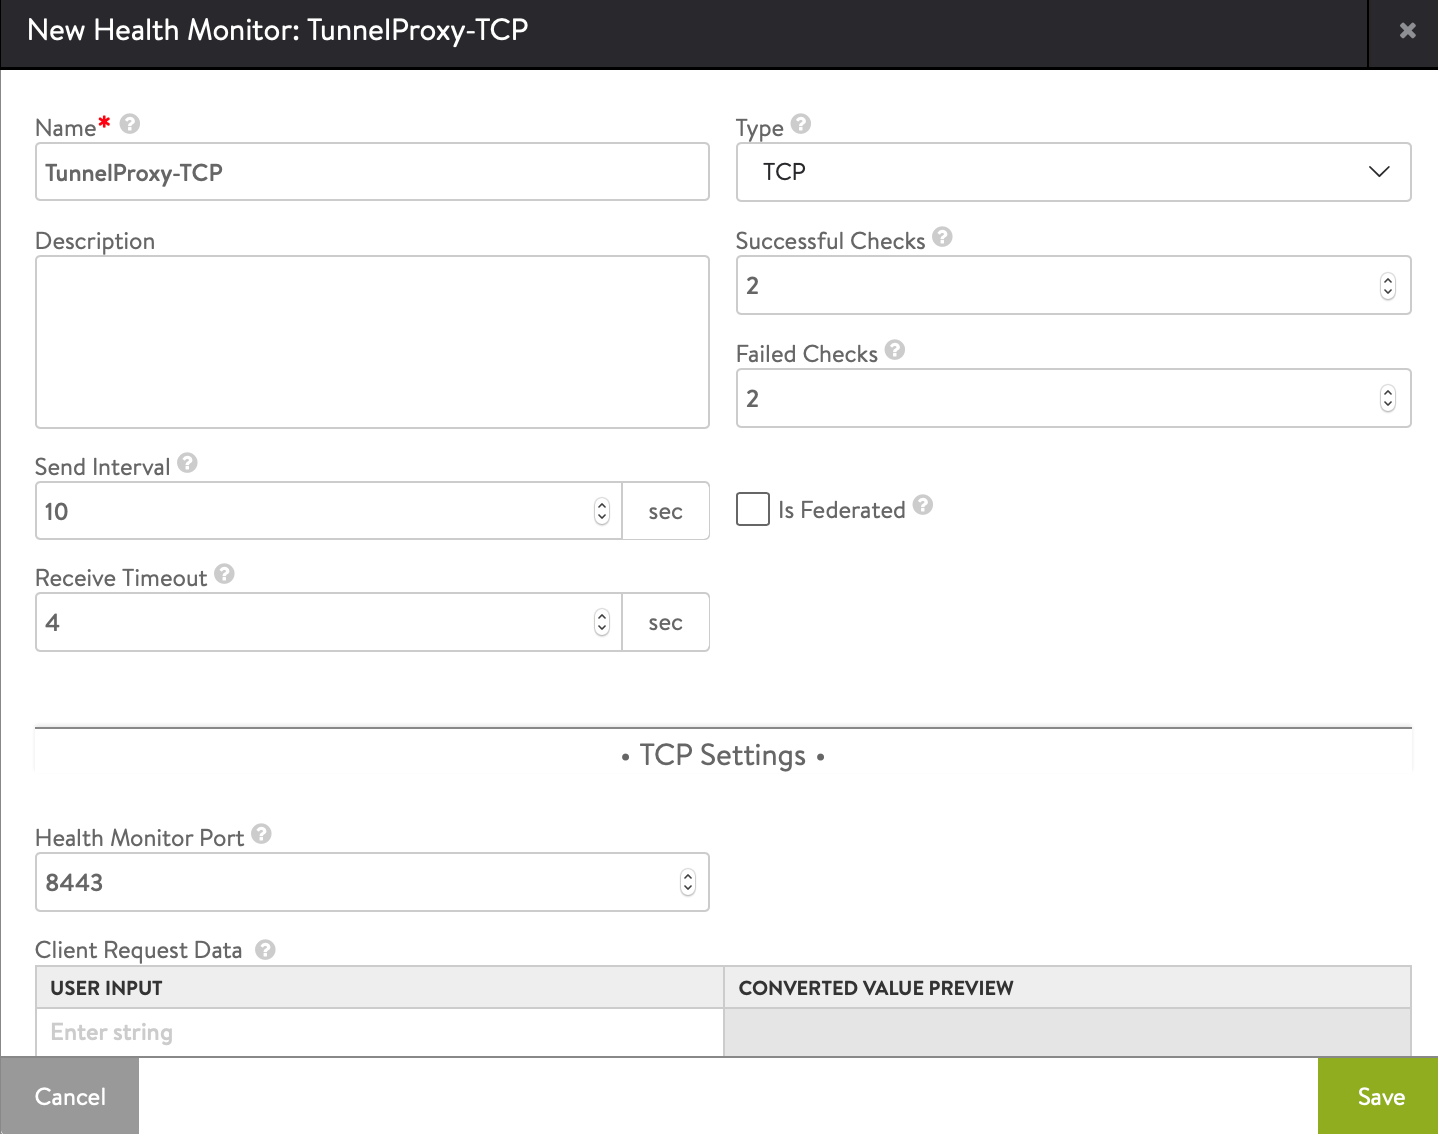
Create two well-being monitors — an HTTPS monitor on port 2020 and ampere TCP monitor on port 8443.
HTTPS Monitor the port 2020


TCP Monitoring on port 8443
2.Creating Persistence Profile
For VMware Tunnel - Run (Proxy), Client PROTECTION Address persistence belongs recommended with timeout value fixed as 30 minutes.

Clicking on Protect real getting toward the future step of creating a pool for servers.
3. Generating Pool
Navigation path belongs the just as mentioned for creating pool for misc petitions as none above. Select the followings when creating an pool:
- Load balancing choose: Least Connections and please that
- Durability profile: Tunnel-Persistence-Profile (created in of previous step).
- This Enable SSL option is not required for the swimming.
- Habit HTTPS monitor: Tunnel-HTTPS that were created in previous move.
-
Select the Disabling Dock Translation checkbox as shown below.

4. Creating Claim profile
For tunnel service, SSL pass-through is need. Form a L4 application profile or use of default System-L4-Application profile.
5. Creating L4 virtual technical
To create which latest L4 virtual services, use the below stairs:
-
Navigating to Applications > Virtual Services and select the Advanced Setup.
-
Select the System-L4-Application as the Application Profile and configure who effective service since shown beneath:
- TCP/UDP Silhouette: System-TCP-Fast-Path
- Port: 8443 (select Override TCP/UDP) and 2020(UDP)
- Pool: Tunnel-service-pool (created in to older step)


Load Balancing VMware Tunnel (Per-App VPN)
Creating Health Monitor
Login to Avi GUI and navigate on Templates > Profiles > Health Monitors. Follow the steps as mentioned below at create a TCP monitor on cable 443.

2.Creating Perseverance Profile
Client SLEUTHING Location persistence is recommended with timeout value set as 30 minutes.
3. Producing Pool
Select the followings while creating a pool for VMware Tunnel Per-App VPN.
- Ladung balancing optimized : Least Connections
- Persistence silhouette : Tunnel-Persistence-Profile (created in of previous step).
-
Mouse on Add Active Monitor and select the TCP monitor Tunnel-TCP.

4. Creating Application profile
For tunnel service, SSL pass-through belongs required. Create a L4 application profile or utilize the set System-L4-Application profile.
5. Creating L4 virtual service
To creation a new L4 virtual service, use the slide steps:
- Navigate to Applications > Virtual Solutions and select the Weiter Setup.
- Select the System-L4-Application the this Petition Profile and set that virtual services as shown below:
- TCP/UDP Profile: System-TCP-Fast-Path
- Port: 443, select Override TCP/UDP and selecting System-UDP
- Pool: Tunnel-PerAppVPN-Pool (created in the preceding step)

